Introducing the ADO.NET Entity Framework
During the development with the database and ADO.NET, we use some traditional way. First we create the database tables and their relationships and then create the classes in the code for business layer. We write our business logic in these classes and performs different operations on the database though these classes. Most of the developers have to do the complex code to move the data between the application and the database. However, to write such type of the code develops must have the database knowledge. In this type of development we generally do not care about the database concepts in our code. Now the Microsoft has introduced the concept of Entity Framework Model where it deals with the database tables as en entity and allows us to write and maintain the code according to the database concepts. Using the entity relationship modeling, developers create the conceptual model of the data and write their code against this model. So we can say “ADO.NET Entity Framework Model allows you to deal with database concepts in your code."
ADO.NET Entity framework intended to make the development easier and more effective for object-oriented application to work with data.
 The Entity Framework architecture

The ADO.NET Entity Framework is a layered framework which abstracts the relational schema of a database and presents a conceptual model.
Data Source: The bottom layer is the data which can be stored in one or many databases.
Data Providers: The data will be accessed by a ADO.NET data provider. At this moment only SQL Server is supported but in the near future there will be data providers for Oracle, MySQL, DB2, Firebird, Sybase, VistaDB, SQLite.
Entity Data Model (EDM): The Entity Data Model consists of 3 parts :
•
Conceptual schema definition language (CSDL) : Declare and define entities, associations, inheritance, ... Entity classes are generated from this schema.
•
Store schema definition language (SSDL) : Metadata describing the storage container (=database) that persists data.
•
Mapping specification language (MSL) : Maps the entities in the CSDL file to tables described in the SSDL file.
Entity Client: EntityClient is an ADO.NET managed provider that supports accessing data described in an Entity Data Model. It is similar to SQLClient, OracleClient and others. It provides several components like EntityCommand, EntityConnection and EntityTransaction.
Object Services: This component enables you to query, insert, update, and delete data, expressed as strongly-typed CLR objects that are instances of entity types. Object Services supports both Entity SQL and LINQ to Entities queries.
Entity SQL (ESQL): Entity SQL is a derivative of Transact-SQL, designed to query and manipulate entities defined in the Entity Data Model. It supports inheritance and associations. Both Object Services components and Entity Client components can execute Entity SQL statements.
LINQ to Entities: This is a strong-typed query language for querying against entities defined in the Entity Data Model.
DATABASE MODELING LAYERS
Common design pattern for data modeling is the division of the data model into three parts: a conceptual model, a logical model, and a physical model
1.Physical Data Model: This model describes how data are represented in the physical resources such as memory, wire or disk. The vocabulary of concepts discussed at this layer includes record formats, file partitions and groups, heaps, and indexes. The physical model is typically invisible to the application –applications
2.Logical/Relational Data Model: The concepts discussed at the logical level include tables, rows, and primary key-foreign key constraints, and normalization.
 3.Conceptual Model:
 The conceptual model captures the core information entities from the problem domain and their relationships. conceptual model is the Entity-Relationship Model. UML is a more recent example of a conceptual model
 Why Entity Framework is used/ADO.NET Entity Data Model
Entity Framework maps relational tables, columns, and foreign key constraints in logical models to entities and relationships in conceptual models. The Entity Data Model tools generate extensible data classes based on the conceptual model. These classes are partial classes that can be extended with additional members that the developer adds. The classes that are generated for a particular conceptual model derive from base classes that provide Object Services for materializing entities as objects and for tracking and saving changes. Developers can use these classes to work with the entities and relationships as objects related by navigation properties.
Object Services: Object Services is a component of the Entity Framework that enables you to query, insert, update, and delete data, expressed as strongly typed CLR objects that are instances of entity types. Object Services supports both Language-Integrated Query (LINQ) and Entity SQL queries against types that are defined in an Entity Data Model (EDM).
Entity framework enables application to access and change the data that is represented as entities and relationship in the conceptual model. Object Services uses the EDM to translate object queries against entity types that are represented in the conceptual model into data source-specific queries. Query results are materialized into objects that Object Services manages. The Entity Framework provides the following ways to query an EDM and return objects:
• LINQ to Entities - provides Language-Integrated Query (LINQ) support for querying entity types that are defined in a conceptual model.
• Entity SQL - a storage-independent dialect of SQL that works directly with entities in the conceptual model and that supports EDM features such as inheritance and relationships. Entity SQL is used both with object queries and queries that are executed by using the EntityClient provider. For more information, see Entity SQL Overview.
• Query builder methods - enables you to construct Entity SQL queries using LINQ-style query methods. For more information, see Query Builder Methods (Entity Framework).
The Entity Framework includes the EntityClient(The EntityClient provider is a data provider used by Entity Framework applications to access data described in an Entity Data Model (EDM)) data provider. This provider manages connections, translates entity queries into data source-specific queries, and returns a data reader that Object Services uses to materialize entity data into objects. When object materialization is not required, the EntityClient provider can also be used like a standard ADO.NET data provider by enabling applications to execute Entity SQL queries and consume the returned read-only data reader.
The following mythology is used generally

If you use the Entity Framework concept then the result would be

Thus we can say the ADO.NET Entity Framework provide the abstraction layer between the logical data model and application domain. When you will generate the logical tables to entity data diagram, it combines multiple data tables to one entity.
NET 3.5 SP1 includes the new ADO.NET Entity Framework, which allows developers to define a higher-level Entity Data Model over their relational data, and then program in terms of this model. Concepts like inheritance, complex types and relationships can be modeled using it.
Scheme file (EDMX)
If can also see the EDMS file as XML. To see the xml file open the solution explorer, right click on .EDMS file, select Open With XML Editor.

Now you can see here 3 sections
1. Conceptual Model (CSDL)
2. Storage Model (SSDL)
3. Mapping (MSL)
<?xml version="1.0" encoding="utf-8"?>

<edmx:Edmx Version="1.0" xmlns:edmx="http://schemas.microsoft.com/ado/2007/06/edmx">

  <edmx:Runtime>

    <!-- CSDL content -->

    <edmx:ConceptualModels>

      <Schema Namespace="NorthwindModel" Alias="Self" xmlns="http://schemas.microsoft.com/ado/2006/04/edm">

        <EntityContainer Name="NorthwindEntities">

          <EntitySet Name="Employees" EntityType="NorthwindModel.Employee" />

          <AssociationSet Name="FK_Orders_Employees" Association="NorthwindModel.FK_Orders_Employees">

            <End Role="Employees" EntitySet="Employees" />

            <End Role="Orders" EntitySet="Orders" />

          </AssociationSet>

        </EntityContainer>

        <EntityType Name="Employee">

          <Documentation><Summary>Employee entity which corresponds with the Northwind.Employees table</Summary></Documentation>

          <Key>

            <PropertyRef Name="EmployeeID" />

          </Key>

          <Property Name="EmployeeID" Type="Int32" Nullable="false" />

          <Property Name="LastName" Type="String" Nullable="false" MaxLength="20" />

          <Property Name="FirstName" Type="String" Nullable="false" MaxLength="10" />

          <NavigationProperty Name="Orders" Relationship="NorthwindModel.FK_Orders_Employees" FromRole="Employees" ToRole="Orders" />

        </EntityType>

      </Schema>

    </edmx:ConceptualModels>


    <!-- SSDL content -->

    <edmx:StorageModels>

      <Schema Namespace="NorthwindModel.Store" Alias="Self" ProviderManifestToken="09.00.1399"

        xmlns="http://schemas.microsoft.com/ado/2006/04/edm/ssdl">

        <EntityContainer Name="dbo">

          <EntitySet Name="Employees" EntityType="NorthwindModel.Store.Employees" />

          <AssociationSet Name="FK_Orders_Employees" Association="NorthwindModel.Store.FK_Orders_Employees">

            <End Role="Employees" EntitySet="Employees" />

            <End Role="Orders" EntitySet="Orders" />

          </AssociationSet>

      </Schema>

    </edmx:StorageModels>


    <!-- C-S mapping content -->

    <edmx:Mappings>

      <Mapping Space="C-S" xmlns="urn:schemas-microsoft-com:windows:storage:mapping:CS">

        <EntityContainerMapping StorageEntityContainer="dbo" CdmEntityContainer="NorthwindEntities">

          <EntitySetMapping Name="Employees">

            <EntityTypeMapping TypeName="IsTypeOf(NorthwindModel.Employee)">

              <MappingFragment StoreEntitySet="Employees">

                <ScalarProperty Name="EmployeeID" ColumnName="EmployeeID" />

                <ScalarProperty Name="LastName" ColumnName="LastName" />

                <ScalarProperty Name="FirstName" ColumnName="FirstName" />

              </MappingFragment>

            </EntityTypeMapping>

          </EntitySetMapping>

          <AssociationSetMapping Name="FK_Orders_Employees" TypeName="NorthwindModel.FK_Orders_Employees" StoreEntitySet="Orders">

            <EndProperty Name="Employees">

              <ScalarProperty Name="EmployeeID" ColumnName="EmployeeID" />

            </EndProperty>

            <EndProperty Name="Orders">

              <ScalarProperty Name="OrderID" ColumnName="OrderID" />

            </EndProperty>

            <Condition ColumnName="EmployeeID" IsNull="false" />

          </AssociationSetMapping>

        </EntityContainerMapping>

      </Mapping>

    </edmx:Mappings>

  </edmx:Runtime>

</edmx:Edmx>
When you build your project, MSBuild will extract the CSDL/SSDL/MSL content from the EDMX file and places these 3 seperate XML files in your project output directory.
Model View
The Model Browser window can be used to visualize the conceptual model and storage model in a well-organized tree hierarchy.

• Conceptual Model
o Entity Types : Employee
o Associations : FK_Orders_Employees
o Entity Container
1. Entity Sets : Employees
2. Association Sets
3. Function Imports
• Storage Model
o Tables / Views : Employees
o Stored Procedures
o Constraints
Generating an Entity Data Model in Your Visual Studio Project
The very first step you have to generate the Entity Data Model for your database. Here I am using the asp.net web application to create the sample of the Entity Data Mode.
Right click on sample project -> Add -> New Item -> ADO.NET Entity Data Model

Changed the model name to EntityDataModel.edmx

Select the Generate from database and click on Next

Select your database connection or create New Connection. And click on Next button
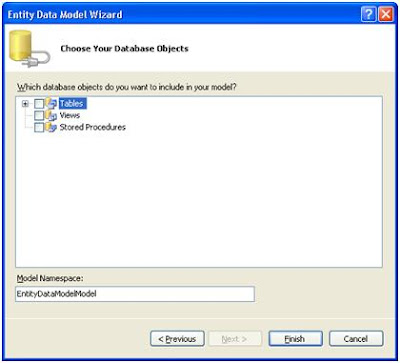
You can select objects (Tables, Vies, Stored Procedures) from this window. Then click on the Finish button. Blow is the graphical representation of the Entity Data Mode (EDM) that is generated by the wizard.

Here I have created a .aspx page to fetch all the categories from the database with the Entity Framework Model and showing the products in the gridview by the selected category.
The .aspx page is
 <table width="100%">

            <tr>

                <td align="right" >

                    Category :

                </td>

                <td>

                    <asp:DropDownList ID="drpCategory" runat=server AutoPostBack=true

                        onselectedindexchanged="drpCategory_SelectedIndexChanged" ></asp:DropDownList>

                </td>

            </tr>

            <tr>

                <td colspan="2" align="center" style="padding-top:10px" >

                    <asp:GridView ID="dgridProducs" Width="90%" runat=server ></asp:GridView>

                </td>

            </tr>

   </table>
Code:
NORTHWNDEntities obNORTHWNDEntities = new NORTHWNDEntities();


        protected void Page_Load(object sender, EventArgs e)

        {

            if (IsPostBack) return;

            FillCategories();

        }


        private void FillCategories()

        {

            try

            {

                drpCategory.DataSource = obNORTHWNDEntities.Categories;

                drpCategory.DataTextField = "CategoryName";

                drpCategory.DataValueField = "CategoryID";

                drpCategory.DataBind();

            }

            catch

            {

                throw;

            }

        }


        protected void drpCategory_SelectedIndexChanged(object sender, EventArgs e)

        {

            int categoryID =Convert.ToInt32(drpCategory.SelectedValue);


            IQueryable<Products> products = from c in obNORTHWNDEntities.Products

                                                where c.Categories.CategoryID ==  categoryID

                                                select c;


            dgridProducs.DataSource = products;

            dgridProducs.DataBind();

        }

    }
Here obNORTHWNDEntities represent the NORTHWNDEntities context. To fill all the categories into the DrowDownList the FillCategories() is used. To fetch all the product of the selected categories, called the SelectedIndexChanged of the dropdownlist.
 How to: Add, Modify, and Delete Objects (Entity Framework)
Here I have created an Employee page where you can add, modify and delete a new employee from the database through the Entity Framework.

To show all the employees the FillEmployees() has been called on the page load event.
 private void FillEmployees()

        {

            dgridEmployee.DataSource = obNORTHWNDEntities.Employees;

            dgridEmployee.DataBind();

        }
To add the new employee AddNewEmployee() has been used.
 private void AddNewEmployee()

        {

            Employees obEmployee = new Employees();


            obEmployee.EmployeeID = -1;


            obEmployee.FirstName = txtFirstName.Text.Trim();


            obEmployee.LastName = txtLastName.Text.Trim();


            obEmployee.City = txtCity.Text.Trim();


            obEmployee.Country = txtCountry.Text.Trim();


            obNORTHWNDEntities.AddToEmployees(obEmployee);


            obNORTHWNDEntities.SaveChanges();


        }
Since this the new employee that’s why the employeeID has been assigned to -1. After assigning all the values to the new employee object it has to be added to the obNORTHWNDEntities context through the AddToEmployees() method. To save the employee to the database SaveChanges() is called.
For modifying the employee, the EditEmployee() functions has been called.
 private void EditEmployee()

        {


            Employees obEmployee = new Employees();


            int employeeId = Convert.ToInt32(hdnEmployeeId.Value);


            //IQueryable<Employees> employees = from c in obNORTHWNDEntities.Employees

            //                                  where c.EmployeeID == employeeId

            //                                  select c;


            //List<Employees> obCollection = employees.ToList<Employees>();


            //obEmployee = obCollection[0];


            //IQueryable<Employees> emp = obNORTHWNDEntities.Employees.Where("it.EmployeeID=" + employeeId);


            //obEmployee = emp.First();


            obEmployee = obNORTHWNDEntities.Employees.Where("it.EmployeeID=" + employeeId).First();


            obEmployee.FirstName = txtFirstName.Text.Trim();


            obEmployee.LastName = txtLastName.Text.Trim();


            obEmployee.City = txtCity.Text.Trim();


            obEmployee.Country = txtCountry.Text.Trim();


            hdnEmployeeId.Value = string.Empty;


            obNORTHWNDEntities.SaveChanges();

        }
First of all the modified employees information is fatched.
obEmployee = obNORTHWNDEntities.Employees.Where("it.EmployeeID=" + employeeId).First();
you can also use the following code to fetch the employee information
//IQueryable<Employees> employees = from c in obNORTHWNDEntities.Employees

   //                                  where c.EmployeeID == employeeId

   //                                  select c;


   //List<Employees> obCollection = employees.ToList<Employees>();


   //obEmployee = obCollection[0];


After assinging the modified values you need to call the obNORTHWNDEntities.SaveChanges().
1. Create the stored procedure to fetch all the orders of a customer
Create PROCEDURE [dbo].[GetOrderByCustomer]

@CustomerID nchar(5)

AS

SELECT *

FROM Orders

WHERE CustomerID = @CustomerID

ORDER BY OrderID
2. Now you have to import this stored procedure to your EDM. There are two ways: first you have to regenerate the EDM and import is via the designer, or in second way you can edit the xml file directly. Here we are using the first method.
a. Right click on the Entity Designer View and click on the Update Model from Database.

b. Choose the newly created stored procedure what you want to include.

3. Go to the Model Browser and search the newly imported stored procedure
4. Right click on that stored procedure and then click on Create Function Import.

5. A new Add Function Import window will be opened. Here select the Entities to Orders. Since this function returns the order list.

To fetch all the orders of a customer the above stored procedure is used in the c# code.
   private void FillOrder()

        {

            using (NORTHWNDEntities obNORTHWNDEntities = new NORTHWNDEntities())

            {

                ObjectResult<Orders> objectResultOrder = obNORTHWNDEntities.GetOrderByCustomer("ALFKI");


                dgridOrder.DataSource = objectResultOrder;

                dgridOrder.DataBind();


            }

        }
1. Create the stored procedure to insert the new employee
CREATE PROCEDURE InsertEmployee


@FirstName nvarchar(20)

,@LastName nvarchar(20)


AS

BEGIN


INSERT INTO EMPLOYEES

(

 FirstName

 ,LastName


)

VALUES

(

 @FirstName

 ,@LastName

)


SELECT MAX(EmployeeID) as NewEmployeeID FROM Employees


END

GO
2. Right click on the Employee entity on the EDM and click on Stored Procedure Mapping.

Once you click on that, you will see the Mapping Details window

Here you can map your insert, update and delete stored procedure. Now you have insertEmployee stored procedure to map this procedure click on the <Select Insert Function> then select the InsertEmployee stored procedure from the dropdownlist box.
 Difference between LINQ to SQL and Entity Framework
LINQ to SQL is an object-relational mapping (ORM) framework that allows the direct 1-1 mapping of a Microsoft SQL Server database to .NET classes, and query of the resulting objects using LINQ. More specifically, LINQ to SQL has been developed to target a rapid development scenario against Microsoft SQL Server where the database closely resembles the application object model and the primary concern is increased developer productivity. LINQ2SQL was first released with C# 3.0 and .Net Framework 3.5.
• LINQ to SQL supports a wide breadth of abstractions
• LINQ to SQL support domain Model
• Linq to SQL is only for SQL
• LINQ to SQL is simple to use
• LINQ to SQL is used for rapid development.
• LINQ to SQL class uses the mapping only for the single table
• LINQ to SQL generate only dbml file
LINQ to Entities (ADO.Net Entity Framework) is an ORM (Object Relational Mapper) API which allows for a broad definition of object domain models and their relationships to many different ADO.Net data providers. As such, you can mix and match a number of different database vendors, application servers or protocols to design an aggregated mash-up of objects which are constructed from a variety of tables, sources, services, etc. ADO.Net Framework was released with the .Net Framework 3.5 SP1.
• Entity framework supports a high level of abstraction.
• Entity framework support conceptual data mode.
• Entity Framework will have ability to target different database engines in addition to Microsoft SQL Server.
• Entity framework is complex to use.
• Entity framework is slower development but has more capabilities.
• Entity framework map a single class to multipal tables
• Entity framework generate the three xml files csdl, msl and ssdl.
Reference:
http://blogs.msdn.com/adonet/archive/2007/05/30/entitysql.aspx
http://msdn.microsoft.com/en-us/library/bb399567.aspx


